Skip to content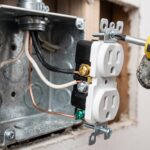
Have you ever plugged a phone charger or vacuum into a wall socket, only to watch it slide straight out? Loose wall receptacles are common in older homes, but they are more than a minor annoyance. When internal metal contact blades loosen, they cause electrical arcing, which represents a primary cause of residential electrical fires according to the Electrical Safety Foundation International (ESFI). Knowing when and how to replace an electrical outlet is an essential skill that protects your household.
Across Ventura County, home age plays a significant role in electrical wear. Many neighborhoods throughout Ventura, Oxnard, Camarillo, and Thousand Oaks were built between 1960 and 1985. Consequently, their original receptacles have experienced decades of mechanical friction. In coastal cities like Ventura and Oxnard, moist ocean air can also accelerate corrosion on older brass terminal screws. Meanwhile, fluctuating indoor temperatures in inland valleys like Camarillo and Thousand Oaks loosen wall plate mountings over time.
Fortunately, learning how to replace an electrical outlet is an approachable weekend project. When you follow strict safety practices and use the right tools, you can replace a wall outlet in under 30 minutes. This comprehensive guide walks you through every step to complete a clean, code-compliant receptacle replacement.
Project Overview: Replacing an Electrical Outlet
-
Skill Level: Beginner to Intermediate
-
Estimated Time: 20 to 30 minutes per receptacle
-
Average DIY Cost: $3 – $7 for standard tamper-resistant receptacles ($15 – $25 for GFCI or USB outlets)
-
Estimated DIY Savings: $125 – $225 compared to a professional service call
Tools and Materials Needed to Replace an Electrical Outlet
Gathering your tools ahead of time ensures a smooth and safe installation. Avoid using makeshift hand tools when working with electrical devices.
Essential Tools
-
Non-contact voltage tester: The most critical tool for your safety; verifies that zero electrical current enters the box.
-
Manual #2 Phillips and flathead screwdrivers: Essential for removing faceplates and torquing terminal screws down snugly.
-
Wire strippers and cutters: Used to snip damaged conductors and expose clean copper wire.
-
Needle-nose pliers: Needed to bend uniform, clockwise loops in solid copper conductors.
-
Three-prong receptacle tester: Used to verify correct circuit polarity and ground continuity after you finish.
Recommended Materials
-
New 15-amp or 20-amp tamper-resistant duplex outlet: Required by the National Electrical Code and recommended by the U.S. Consumer Product Safety Commission (CPSC) to prevent children from inserting foreign objects.
-
Unbreakable nylon wall plate: Far more resistant to cracking than brittle plastic plates.
-
Quality electrical tape: Used to insulate side terminal screws from metal junction boxes.
-
Assorted wire nuts: Required if you need to pigtail multiple conductors inside the wall box.
Safety Rules Before You Replace an Electrical Outlet
Electrical safety requires zero compromises. Always review these essential safety precautions before you replace an electrical outlet:
-
Always disconnect the main breaker: Never rely on a wall switch to turn off power. Always shut off the dedicated circuit breaker at your main service panel.
-
Test your voltage tester first: Test your non-contact tester on a known live receptacle in another room to confirm it functions. Afterward, test the outlet you plan to service.
-
Match circuit amperage: Always match the replacement outlet rating to your circuit breaker size. Use a 15-amp receptacle on 14-gauge wire, and a 20-amp receptacle on 12-gauge wire.
-
Inspect for aluminum wiring: If your house wiring is silver-colored and stamped “AL,” do not connect standard copper receptacles. Aluminum wiring requires specialized connectors installed by a licensed electrician.
Wiring Basics Before You Replace an Electrical Outlet
Standard 120-volt residential circuits use three distinct conductors. Understanding what each wire does makes it much simpler to replace an electrical outlet correctly:
-
Hot Wire (Black or Red): Supplies 120-volt current from the breaker panel. Always connect this wire to the brass terminal screws.
-
Neutral Wire (White): Completes the circuit loop back to the electrical panel. Always connect this wire to the silver terminal screws.
-
Ground Wire (Bare Copper or Green): Carries fault currents safely into the ground rod. Always attach this wire to the green hexagonal grounding screw.
Step-by-Step Guide: How to Replace an Electrical Outlet
Step 1: Shut Off Power Before Replacing an Outlet
Begin by locating your main breaker box. Flip the breaker controlling the target room to the “OFF” position.
Next, return to the room and insert your non-contact voltage tester into both vertical slots of the socket. The sensor should produce no sound or light. Then, remove the faceplate screw and pull the cover away. Hold the tester against each insulated wire inside the junction box to verify that the power is completely off.
Step 2: Remove the Old Wall Outlet
Once you verify that power is disconnected, remove the top and bottom screws anchoring the outlet yoke to the wall box.
Gently pull the outlet forward, extending the wires straight out into the room. Inspect the existing layout carefully. Take a clear reference photograph with your smartphone so you have a visual record of how the original wires were connected before unhooking them.
Step 3: Prep Wires to Replace an Electrical Outlet
Loosen the side terminal screws with your manual screwdriver and slide the hooked wire loops off.
If previous installers shoved the wires into spring-clamp holes on the back (known as “backstabbing”), release them by pressing a small precision screwdriver into the release slot. Because push-in connections loosen over time, you should avoid using them when you replace a wall outlet. Inspect the bare copper ends. If they look pitted or oxidized, snip off the ends and use wire strippers to expose 3/4-inch of clean, shiny copper.
Step 4: Wire and Install the New Receptacle
Now you are ready to wire your new tamper-resistant outlet. Always install the ground conductor first:
-
Attach the ground wire: Use needle-nose pliers to form a clockwise hook on the bare copper wire. Slip it around the green grounding screw and tighten down firmly.
-
Connect the neutral wire: Hook the white neutral wire clockwise around a silver terminal screw and tighten it securely.
-
Connect the hot wire: Hook the black hot wire clockwise around a brass terminal screw and tighten down until snug.
-
Insulate the body (Pro-Tip): Wrap two layers of black electrical tape around the perimeter of the outlet body. This covers exposed screw heads and prevents accidental contact with the metal box walls.
Step 5: Mount the Outlet and Reinstall the Faceplate
Carefully fold the copper conductors into an accordion shape as you push the outlet back into the junction box. Avoid pinching wires against sharp metal edges.
Next, drive the top and bottom mounting screws into the junction box until the yoke rests flush against the finished drywall. Place a small torpedo level across the face of the outlet to ensure it sits straight. Finally, install your new nylon faceplate and tighten the center screw until snug.
Step 6: Test Your Newly Replaced Electrical Outlet
Return to your breaker box and switch the circuit breaker back on.
Insert a three-prong receptacle tester into both sockets of your new outlet. Check the illuminated indicator lights on the tester. Two amber lights confirm that your hot, neutral, and ground conductors are connected with correct polarity.
Common Mistakes When Replacing an Electrical Outlet
Avoid these frequent DIY mistakes to keep your home’s electrical system completely safe:
-
Reversing hot and neutral wires: Connecting black wires to silver screws creates reverse polarity. Lamps and appliances will still run, but their internal metal components remain energized, creating an invisible shock hazard.
-
Using push-in backstab terminals: Spring-loaded push-in connections loosen as temperatures fluctuate, leading to arcing and intermittent power loss. Always wrap conductors around side screw terminals.
-
Leaving exposed copper outside the screws: Exposing too much bare wire increases the risk of short circuits inside crowded electrical boxes. Keep stripped insulation to exactly 3/4-inch.
-
Loose terminal screws: Under-tightened screws generate electrical resistance and excess heat. Always tighten terminal screws firmly with a manual screwdriver.
Ventura County Climate and Outlet Maintenance
Regional climate conditions impact electrical components across our communities:
-
Ventura and Oxnard (Coastal Salt Air): Damp, salt-laden marine air enters through open windows, causing oxidation on older electrical contacts. When you replace an electrical outlet near the coast, choose commercial-grade receptacles with heavy-duty brass contacts for superior corrosion resistance.
-
Camarillo and Thousand Oaks (Inland Heat and Dust): Hot Santa Ana winds carry airborne dust through small exterior wall openings. Installing tamper-resistant outlets with internal safety shutters prevents fine particulate buildup inside unused electrical slots.
When to Call a Professional to Replace an Electrical Outlet
While learning how to replace an electrical outlet is an achievable DIY project, certain household conditions require professional craftsmanship:
-
Ungrounded, two-prong receptacles in vintage mid-century homes that require GFCI retrofitting or dedicated ground paths.
-
Aluminum wiring connections that require specialized COPALUM crimping or AlumiConn terminals.
-
Scorched, melted, or burnt wiring discovered inside the electrical junction box.
-
Recurring breaker trips or buzzing noises coming from the wall.
If you encounter complex wiring issues, want whole-home tamper-resistant upgrades, or need help tackling your home repair to-do list, Paul Franc Handyman Services is ready to assist. Proudly serving homeowners, landlords, and commercial properties throughout Ventura, Oxnard, Camarillo, Thousand Oaks, and surrounding Ventura County communities, we provide dependable, quality home repairs done right the first time. Visit paulfranc.com to request an estimate or schedule your service today.