Opening your windows to enjoy fresh evening breezes is one of the greatest pleasures of living in Southern California. However, torn mesh, loose vinyl splines, or holes clawed by pets quickly turn your open windows into an open invitation for unwanted pests. When you learn how to repair a window screen, you restore crisp ventilation, improve your home’s curb appeal, and prevent insect intrusion. According to home pest control guidelines from the U.S. Environmental Protection Agency (EPA), maintaining intact, tightly fitted window screens represents the primary mechanical barrier against mosquitoes, flies, and outdoor allergens entering living spaces.
Across Ventura County, window screens face unique environmental challenges. In coastal communities like Ventura and Oxnard, damp ocean air and morning salt fog corrode older aluminum mesh, making metal wire brittle and prone to oxidation tears. Meanwhile, inland valleys such as Camarillo and Thousand Oaks endure intense UV sun exposure and hot Santa Ana windstorms. Prolonged sun baking dries out vinyl spline rubber, causing it to shrink, crack, and release the screen fabric along frame edges.
Fortunately, learning how to repair a window screen is one of the most satisfying and affordable DIY projects any homeowner can master. In less than 30 minutes per window, you can replace torn, sagging mesh with modern, durable fiberglass fabric for under $10 in materials. This comprehensive guide walks you through every step so you can repair a window screen with tight, professional tension.
Project Overview: Repairing a Window Screen
-
Skill Level: Beginner
-
Estimated Time: 20 to 30 minutes per standard window screen
-
Average DIY Cost: $8 – $15 per screen (for fiberglass mesh and vinyl spline)
-
Estimated DIY Savings: $40 – $75 per screen compared to custom mobile screen replacement services
Tools and Materials Needed to Repair a Window Screen
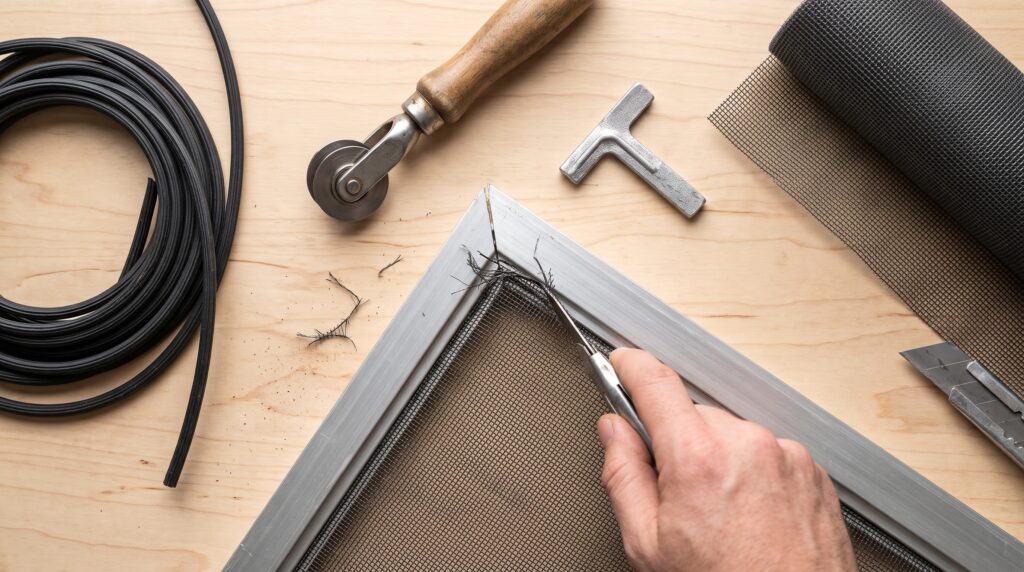
Having the proper screen installation tools on a wide, flat work surface guarantees clean results without bowing your aluminum frames.
Essential Tools
-
Spline roller tool: Features two wheels: a concave (grooved) wheel for pressing spline into the frame and a convex (rounded) wheel for seating the mesh into the channel.
-
Utility knife with fresh razor blades: Essential for making clean, flush perimeter cuts without snagging fabric.
-
Flathead screwdriver or awl: For lifting and pulling out old, hardened vinyl spline.
-
Heavy household shears or scissors: For rough-cutting the screen fabric roll.
-
Tape measure and straightedge ruler: For measuring frame dimensions accurately.
-
Two spring clamps or C-clamps (optional): Holds large patio screen frames flat against your workbench.
Recommended Materials
-
Charcoal fiberglass screen mesh: The modern industry standard; flexible, easy to stretch, and far more dent-resistant than traditional aluminum wire.
-
Hollow vinyl serrated spline: Typically available in diameters ranging from 0.125-inch (1/8-inch) to 0.160-inch (5/32-inch). Always match the diameter of your old spline.
-
Replacement plastic pull tabs and tension springs: Replaces brittle or broken hardware inside the frame channels.
Safety Precautions Before You Repair a Window Screen
Basic workshop safety precautions keep your hands protected while handling sharp aluminum frames:
-
Protect your fingers while trimming: Always pull your utility knife outward along the exterior edge of the aluminum channel. Never pull the blade toward your supporting hand or across your body.
-
Handle older aluminum wire mesh carefully: If you are removing vintage aluminum screening, wear leather work gloves. Frayed aluminum wires can puncture skin easily.
-
Work on a clean, padded surface: Lay down a clean moving blanket or flat sheet of cardboard on your work table. Grit or metal shavings trapped beneath the frame will scratch your window frame paint.
-
Follow architectural glass standards: Ensure window screens fit securely without rattling against exterior glass, following safety guidelines from the National Glass Association (NGA).
Choose the Right Screen Mesh and Spline Size
Selecting the proper materials before starting prevents frustrating installation delays:
-
Fiberglass vs. Aluminum Wire: Modern charcoal fiberglass mesh is significantly easier for DIYers to install than stiff aluminum wire. Fiberglass stretches smoothly around frame corners and will not crease or dent permanently if bumped.
-
Pet-Resistant Screening: If you have dogs or cats that scratch at sliding patio screen doors, upgrade to heavy-duty pet screen fabric. Made from vinyl-coated polyester, pet mesh is seven times stronger than standard fiberglass.
-
Solar Screen Mesh: For west-facing windows in Camarillo and Thousand Oaks, solar shade screening blocks up to 80% of incoming solar heat while maintaining outward visibility.
-
Choosing the Right Spline Diameter: Bringing a 2-inch scrap of your old spline to your local hardware store ensures you buy the exact matching thickness. Spline that is too thick bends aluminum frames inward, while spline that is too thin pulls loose under wind pressure.
Step-by-Step Guide: How to Repair a Window Screen
Step 1: Remove the Screen Frame from the Window
First, safely extract the screen frame from the window opening:
-
Open the window sash fully.
-
Look along the bottom or side frame edges for plastic pull tabs or internal metal tension springs.
-
Push the frame firmly upward (or sideways) into the spring-loaded channel, compressing the leaf springs.
-
Swing the bottom edge of the frame outward, clearing the sill track, and lower the frame carefully into the room.
-
Inspect the frame for severe bends or cracked plastic corner keys. If the frame is twisted out of square, straighten it gently by hand before proceeding.
Step 2: Strip Away Damaged Spline and Old Mesh
Next, clear the old materials to prepare the aluminum channel:
-
Lay the screen frame flat on your clean, padded work table with the spline groove facing upward.
-
Insert the tip of an awl or small flathead screwdriver beneath the vinyl spline near one corner.
-
Pry the end of the spline upward and pull it out of the channel in one continuous strip around the entire perimeter.
-
Lift away the torn screen mesh and discard it.
-
Use an old toothbrush or a dry microfiber cloth to sweep dirt, pet hair, and mineral dust out of the perimeter spline groove.
Step 3: Square and Secure the Aluminum Screen Frame
Preventing “hourglassing” (where tight screen tension pulls the sides of the frame inward) is the secret to a professional installation:
-
Check that the frame corners sit at neat 90-degree angles.
-
For large window screens or sliding patio door frames, clamp the center of the side rails lightly to your table, or place a 1-inch wooden block against the outer middle edges. This slight bow prevents the frame from caving inward as you roll in the spline.
Step 4: Cut and Position the New Screen Fabric
Now prepare the fresh fiberglass mesh:
-
Unroll your charcoal fiberglass screening over the frame.
-
Use household scissors to cut the fabric roughly 2 inches larger than the outer frame dimensions on all four sides.
-
Center the fabric over the frame so an even 2-inch border of excess mesh extends past every edge.
-
Use blue painter’s tape or spring clamps at the top corners to keep the fabric square and flat across the frame.
Step 5: Roll in the Spline to Repair a Window Screen
Rolling in the spline locks the fabric into the frame channel under uniform tension:
-
Pre-crease the channel (Optional Pro-Tip): Run the convex (rounded) wheel of your spline tool gently along the top channel over the mesh. This pushes the fabric into the groove without tearing it.
-
Start at a corner: Take your continuous roll of vinyl spline and place the end into an upper corner.
-
Drive the spline: Use the concave (grooved) wheel of the tool to press the spline firmly down into the groove. Roll in short, steady forward strokes. Hold the tool at a 45-degree angle, guiding the spline into the track.
-
Maintain light tension: As you work along each side, use your opposite hand to gently smooth the mesh outward across the frame. Do not pull the fabric aggressively tight; the downward action of the spline roller naturally tensions the mesh.
-
Turn the corners cleanly: When reaching a 90-degree corner, push the spline down into the corner pocket using the flat tip of your screwdriver, then continue rolling along the next side.
-
Finish the loop: Work around all four sides. When you return to the starting corner, snip the spline with utility shears and press the end flush into the groove.
Step 6: Trim Excess Fabric and Reinstall the Screen
Finally, achieve a clean factory edge and reinstall the screen:
-
Inspect the installed mesh. The fabric should sit drum-tight and flat across the entire frame without diagonal wrinkles or waves.
-
Take a fresh, sharp utility knife blade and hold it at a 45-degree angle against the outer rim of the spline groove.
-
Carefully trace the blade along the outer channel edge, slicing away the excess border mesh in a continuous ribbon. Keep the blade resting against the metal frame so you never accidentally slice into the spline or the interior screen surface.
-
Reinstall any lost pull tabs or corner springs.
-
Carry the screen back to your window, insert the top edge into the upper window channel to compress the tension springs, and swing the lower edge inward until it snaps firmly into the sill track.
Common Mistakes When You Repair a Window Screen
Avoid these frequent DIY pitfalls to ensure that your rescreened frames operate smoothly:
-
Pulling the mesh too tight during installation: Stretching fiberglass screening too aggressively bows aluminum frame rails inward into an hourglass shape, preventing the screen from fitting back into your window track. Keep hand tension gentle and let the roller tool do the work.
-
Using a dull utility knife blade: Dull blades snag and pull fiberglass threads, leaving frayed, ragged edges along the channel. Always install a fresh razor blade before trimming.
-
Installing spline that is too thick: Forcing an oversized spline into the channel stresses corner joints and bends aluminum channels outward. Always match your original spline diameter.
-
Working on uneven surfaces: Assembling a screen on carpeting or an uneven driveway causes the finished frame to twist out of plane. Always work on a solid, flat workbench or hard floor.
Ventura County Climate Tips for Window Screen Longevity
Our local weather patterns require mindful maintenance:
-
Ventura and Oxnard (Combating Coastal Salt Air): Damp maritime fog leaves sticky salt deposits on window screens that trap dirt and obstruct coastal airflow. Rinse your window screens twice a year with a garden hose on a gentle spray setting, and gently wipe frames with a soft sponge and mild dish soap to eliminate salt film.
-
Camarillo and Thousand Oaks (Managing Santa Ana Wind Dust): Dry inland windstorms push fine agricultural topsoil and pollen into screen pores. Vacuum your window screens using a soft dusting brush attachment following high-wind events to keep air flowing freely into your home.
When to Call a Professional to Repair a Window Screen
While rescreening standard window frames is an accessible DIY project, certain structural window conditions require professional craftsmanship:
-
Severely bent, buckled, or crushed aluminum frames that require new extruded aluminum fabrication and custom miter cutting.
-
Custom-sized sliding patio screen doors with broken heavy-duty roller carriages or failed handle latch assemblies.
-
Vintage wood-framed window screens requiring custom millwork, rabbet routing, or historical preservation joinery.
If your window screen frames are badly damaged, your patio slider tracks are sticking, or you prefer a skilled tradesman to handle your home maintenance checklist, Paul Franc Handyman Services is ready to assist. Proudly serving homeowners, landlords, and commercial spaces throughout Ventura, Oxnard, Camarillo, Thousand Oaks, and surrounding Ventura County communities, we provide dependable, quality home repairs done right the first time. Visit paulfranc.com to request an estimate or schedule your service today.