Your front entry door serves as your home’s primary line of defense against unwanted intruders. While standard spring-latch doorknobs keep doors closed against wind, they provide minimal resistance against forced entry. When you take the time to install a deadbolt lock, you dramatically reinforce your entryway and protect your family. According to residential security research from the National Crime Prevention Council (NCPC), homes protected by quality deadbolts with properly reinforced strike plates experience significantly lower rates of successful forced entry.
Across Ventura County, exterior locksets endure challenging seasonal weather conditions that affect mechanical hardware. In coastal communities like Ventura and Oxnard, corrosive salt fog and ocean humidity penetrate internal pin-tumbler cylinders, causing brass and zinc components to stick or bind. Meanwhile, inland areas like Camarillo and Thousand Oaks experience wide daily temperature swings that cause wooden doorframes to expand, contract, and settle. Over time, shifting frames pull deadbolt bolts out of alignment with the strike plate mortise, compromising lock engagement.
Fortunately, learning how to install a deadbolt lock is an accessible, high-reward DIY skill. Whether you are replacing a worn-out lock or upgrading to a modern electronic keypad deadbolt, you can complete the installation in under an hour with basic hand tools. This comprehensive guide outlines the exact steps to install a deadbolt lock with maximum structural security.
Project Overview: Installing a Deadbolt Lock
-
Skill Level: Beginner to Intermediate
-
Estimated Time: 45 to 60 minutes
-
Average DIY Cost: $35 – $95 (for a Grade 1 or Grade 2 deadbolt set)
-
Estimated DIY Savings: $125 – $225 compared to a residential locksmith service call
Tools and Materials Needed to Install a Deadbolt Lock
Having the proper tools arranged in advance ensures clean screw alignment without marring your door’s painted or stained finish.
Essential Tools
-
Manual #2 Phillips and flathead screwdrivers: Prevents stripping delicate machine screws during internal cylinder assembly.
-
Cordless drill and driver bit: Used for driving 3-inch heavy-duty structural security screws into wall framing studs.
-
1/8-inch drill bit: For pre-drilling pilot holes into framing studs to prevent dense 2×4 lumber from splitting.
-
1/2-inch or 3/4-inch wood chisel: Required to recess the strike plate and latch faceplate flush with the frame.
-
Small wooden mallet or hammer: For gently tapping the chisel when trimming mortise pockets.
-
Tape measure and pencil: For measuring backset and strike alignment.
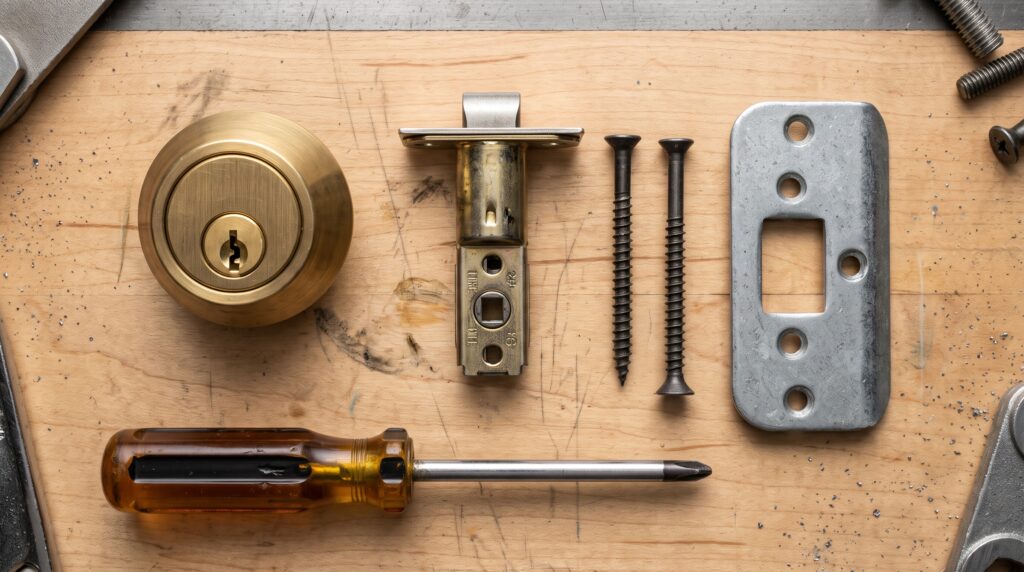
Recommended Materials
-
ANSI/BHMA Certified single-cylinder deadbolt: Single-cylinder deadbolts feature a keyed exterior and an interior thumb-turn for fast emergency egress.
-
Heavy-duty steel reinforcement strike plate: Includes offset screw holes to anchor directly into wall studs.
-
Two 3-inch hardened steel mounting screws: Replaces short factory screws to anchor the strike plate deep into wall framing.
-
Wood glue and wooden golf tees: Used to repair stripped screw holes in older doorjambs before installing new hardware.
Safety Precautions Before You Install a Deadbolt Lock
Home security hardware requires strict attention to structural integrity and emergency exit safety:
-
Prioritize single-cylinder deadbolts for emergency exits: Never install double-cylinder deadbolts (which require a key from both the inside and outside) on primary home egress doors. In the event of an interior fire, occupants can become trapped if a key is not immediately accessible.
-
Wear safety glasses when pre-drilling and chiseling: Wood splinters and metal shavings can fly into your eyes while driving long structural screws or trimming mortises.
-
Verify door slab integrity: Ensure your door slab is solid wood, solid core, or metal-clad. Hollow-core doors cannot support deadbolt hardware and should never be used as exterior entry doors.
-
Adhere to certified hardware standards: Always choose locks verified by the Builders Hardware Manufacturers Association (BHMA), ensuring rigorous testing for impact resistance and cycle durability.
Understanding Deadbolt Security Grades and Hardware Types
Selecting the correct lockset ensures long-lasting perimeter protection:
-
BHMA Grade 1 (Commercial/Heavy Residential): The highest security rating available. Tested to withstand 10 hammer strikes and 250,000 lock cycles, featuring hardened steel anti-saw pins inside the bolt.
-
BHMA Grade 2 (Standard Residential): Excellent everyday protection for most residential homes. Tested to withstand 5 hammer blows and 150,000 operational cycles.
-
Backset Dimensions: The backset is the distance from the edge of the door to the center of the pre-drilled bore hole. Residential doors feature either a 2-3/8-inch or 2-3/4-inch backset. Modern quality deadbolts include an adjustable latch that easily converts between both measurements.
Step-by-Step Guide: How to Install a Deadbolt Lock
Step 1: Measure Backset and Hole Diameter
First, verify your door preparation dimensions:
-
Measure from the edge of the door slab to the center of the round bore hole. Note whether your measurement is 2-3/8 inches or 2-3/4 inches.
-
Verify that the large bore hole measures 2-1/8 inches in diameter and that the small edge cross-bore hole measures 1 inch.
-
If replacing an old lockset, remove the two mounting screws holding the interior thumb-turn, slide the interior and exterior cylinders apart, and unthread the latch bolt from the edge of the door.
Step 2: Install the Deadbolt Latch Bolt Assembly
Next, configure and seat the bolt mechanism inside the door edge:
-
Adjust the latch bolt to match your measured backset by twisting the mechanism until the internal cam matches 2-3/8 or 2-3/4 inches.
-
Insert the latch bolt into the 1-inch edge hole, ensuring that the word “TOP” or the stamped arrow faces upward.
-
Push the bolt assembly in until the rectangular metal faceplate rests flush against the door edge mortise.
-
If your door lacks a pre-cut mortise, trace around the rectangular faceplate with a pencil, remove the bolt, and use a sharp wood chisel to carve a shallow 1/8-inch pocket.
-
Drive the two 3/4-inch wood screws through the faceplate to secure the latch firmly to the door edge.
Step 3: Install the Exterior Cylinder and Interior Turnpiece
Now assemble the central keyed locking mechanism:
-
Extend the deadbolt bolt to the locked position using a flathead screwdriver inserted into the center cam. (Installing while extended ensures correct mechanical timing).
-
Take the exterior keyed cylinder and thread the flat horizontal tailpiece (torque blade) through the rectangular slot in the center of the latch bolt.
-
Route the cylinder through the exterior door hole, keeping the keyway oriented vertically.
-
Place the interior mounting plate (or thumb-turn assembly) over the hole on the inside face of the door.
-
Insert the two heavy machine screws through the interior plate, threading them by hand into the exterior cylinder housing to avoid cross-threading.
-
Tighten the screws evenly with your manual #2 Phillips screwdriver. Avoid overtightening with power drivers, which can bind the internal tumblers.
-
Test the key and thumb-turn. Both should rotate smoothly, extending and retracting the 1-inch steel bolt without resistance.
Step 4: Align and Chisel the Jamb Strike Mortise
A deadbolt is only as strong as the doorjamb that receives it:
-
Coat the tip of the extended deadbolt with dry-erase marker, chalk, or a dab of lipstick.
-
Close the door firmly against the weatherstripping until the doorknob latches.
-
Turn the deadbolt thumb-turn so the bolt tip marks the doorjamb trim, indicating the exact center of your strike pocket.
-
Drill a 1-inch hole centered on your mark at least 1-1/4 inches deep into the doorjamb. This ensures the 1-inch bolt extends fully; deadbolts only lock securely when thrown to their full length.
-
Place the steel strike plate over the hole, trace the outer perimeter with a pencil, and use your chisel to carve a flush mortise into the jamb wood.
Step 5: Secure the Reinforcement Plate with 3-Inch Screws
Standard short 3/4-inch screws only anchor into 3/4-inch pine decorative trim, which splits open easily when kicked. Heavy-duty security requires structural anchoring:
-
Place the heavy steel reinforcement strike plate over the hole.
-
Pre-drill two pilot holes through the rear screw openings using your 1/8-inch drill bit, drilling at a slight inward angle toward the wall stud framing behind the jamb.
-
Drive two 3-inch hardened steel security screws through the reinforcement plate. These long screws pass directly through the decorative jamb and bite deeply into the solid structural 2×4 framing studs.
-
Place the decorative brass or nickel finish strike plate on top, securing it with the two standard 3/4-inch screws into the front holes.
Step 6: Test the Deadbolt Bolt Throw and Smooth Action
Finally, verify that your new deadbolt operates without binding:
-
Close the door and turn the interior thumb-turn to throw the bolt into the jamb.
-
The bolt should extend completely and click into place without requiring you to pull, push, or lean your shoulder against the door slab.
-
Test operation from the outside using the key. The key should turn effortlessly and withdraw cleanly in the upright position.
Common Mistakes When You Install a Deadbolt Lock
Avoid these frequent DIY pitfalls to ensure reliable operation and maximum security:
-
Relying on short strike plate screws: Installing only standard 3/4-inch screws leaves your door vulnerable to kick-in attacks. Always drive 3-inch screws into the solid wall studs behind the jamb.
-
Shallow bolt hole drilling: If the hole drilled into the doorjamb is only 3/4-inch deep, a 1-inch deadbolt cannot fully extend. When a deadbolt fails to throw completely, its internal anti-pick deadlock mechanism does not engage.
-
Misaligning with weatherstripping: If you must shove the door hard against weatherstripping just to turn the lock, the latch is misaligned. Adjust the strike plate mortise until the bolt throws freely while the door rests naturally against its seals.
-
Using an impact driver on cylinder screws: High-torque power tools strip the soft internal brass threads of lock cylinders. Always hand-tighten cylinder machine screws.
Ventura County Climate Tips for Exterior Door Lock Maintenance
Our local weather patterns require simple, ongoing lock care:
-
Ventura and Oxnard (Combating Coastal Salt Corrosion): Salt-laden marine air oxidizes exterior lock finishes and dries out internal cylinder tumblers. Twice a year, spray dry graphite lubricant (or specialized lock fluid) into the keyway. Never use WD-40 or multi-purpose oil, which gum up internal tumblers and attract coastal sand.
-
Camarillo and Thousand Oaks (Managing Seasonal Frame Expansion): In the Conejo Valley, shifting summer heat and dry autumn winds cause door slabs and frames to swell and shrink. If your deadbolt begins rubbing against the strike plate during seasonal weather shifts, file the interior edge of the strike plate opening slightly rather than repositioning the entire lock.
When to Call a Professional to Install a Deadbolt Lock
While upgrading an existing pre-drilled lockset is a straightforward DIY project, certain entryway configurations require professional tradesmanship:
-
Fresh door installations on blank solid wood doors where no bore holes exist, requiring specialized door jig templates and hole saws.
-
Historic solid hardwood doors or vintage mortise locksets requiring custom carpentry and jamb rebuilding.
-
Installing high-tech commercial smart locks requiring integrated electrical conduit, video doorbells, or electronic strikes.
If your doorframe is cracked, your strike plate is misaligned, or you prefer a professional tradesman to handle your home maintenance checklist, Paul Franc Handyman Services is ready to assist. Proudly serving homeowners, landlords, and commercial spaces throughout Ventura, Oxnard, Camarillo, Thousand Oaks, and surrounding Ventura County communities, we provide dependable, quality home repairs done right the first time. Visit paulfranc.com to request an estimate or schedule your service today.