A puddle of mud beneath your garden hose spigot is more than an eyesore. In fact, a hose bibb that drips constantly wastes thousands of gallons of treated water every year. When you learn how to fix a leaking outdoor spigot, you protect your foundation and save money on your utility bills. According to outdoor water conservation studies from the U.S. Environmental Protection Agency (EPA) WaterSense Program, outdoor water use accounts for nearly 8 billion gallons of water each day across the nation, with leaks being a major source of waste.
In Ventura County, fixing outdoor plumbing leaks is especially critical. Water providers across Ventura, Oxnard, Camarillo, and Thousand Oaks enforce tiered billing rates that penalize high water usage. In addition, standing water next to exterior stucco walls causes serious damage. The constant moisture saturates foundation soil, leading to slab settling and attracting subterranean termites. Furthermore, regional tap water carries heavy mineral hardness. Calcium scale builds up around brass valve seats, chewing through rubber washers and causing steady drips.
Fortunately, learning how to fix a leaking outdoor spigot is an easy DIY project. You do not need to cut into your exterior stucco or hire an expensive plumber. In fact, replacing a 50-cent rubber washer or tightening a packing nut solves the leak in under 30 minutes. In addition, all standard replacement parts comply with home plumbing codes from the International Association of Plumbing and Mechanical Officials (IAPMO). This complete guide shows you how to fix a leaking outdoor spigot safely and permanently.
Project Overview: Fixing a Leaking Outdoor Spigot
-
Skill Level: Beginner
-
Estimated Time: 20 to 30 minutes
-
Average DIY Cost: $5 – $10 for a multi-size washer kit and grease
-
Estimated DIY Savings: $150 – $225 compared to a plumbing service call
Tools and Materials Needed to Fix a Leaking Outdoor Spigot
Gathering your tools beforehand ensures you can complete the repair quickly while your home water is turned off.
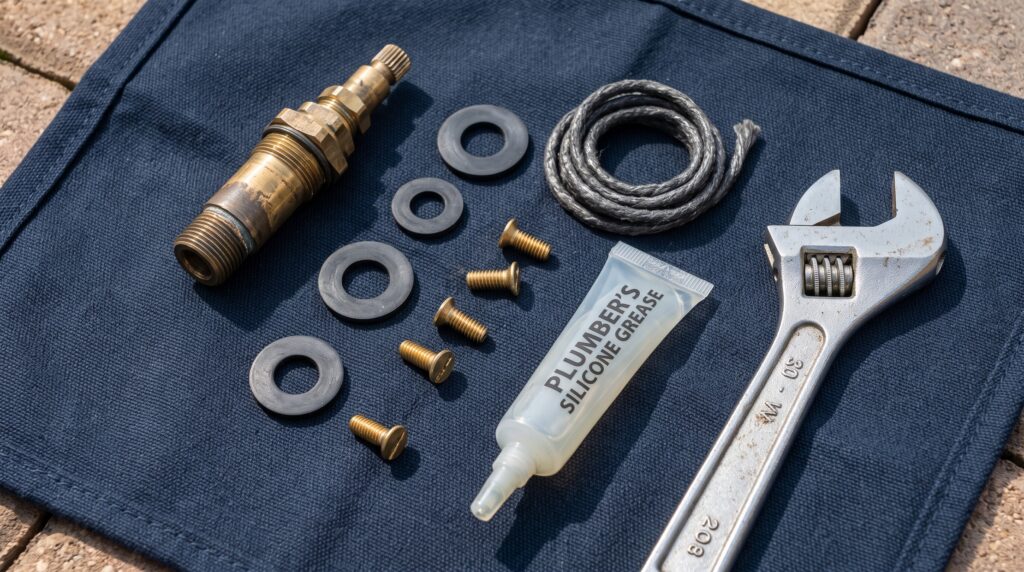
Essential Tools
-
Two adjustable wrenches or channel-lock pliers: You must use two wrenches to back up the brass pipe and prevent twisting copper lines inside the wall.
-
Manual flathead and #2 Phillips screwdrivers: For removing the handle screw and the internal washer retaining screw.
-
Small wire brush or old toothbrush: Cleans mineral scale out of the brass valve body.
-
Utility knife or small pick: Removes dried, hardened rubber washers from the brass stem.
Recommended Materials
-
Assorted rubber faucet washer kit: Contains flat and beveled neoprene bibb washers in standard 3/8-inch and 1/2-inch sizes.
-
New brass bibb screws: Replaces corroded screws that hold the bottom washer in place.
-
Graphite or Teflon valve packing string (or stem packing washer): Seals the valve stem against water leaking around the handle.
-
Food-grade plumber’s silicone grease: Lubricates fresh rubber parts for smooth turning.
Safety Precautions Before You Fix a Leaking Outdoor Spigot
Outdoor plumbing requires careful handling to protect your home’s main water lines:
-
Always support the valve body with two wrenches: Never turn a spigot nut using only one wrench. If you twist the valve without holding the pipe behind it, you can snap the copper supply line hidden inside your exterior wall.
-
Turn off the main water valve first: Always shut off water to the home before loosening any brass plumbing nuts. In addition, open the spigot to relieve water pressure before working.
-
Wear eye protection and work gloves: Old brass can have sharp edges, and mineral scale can chip off into your eyes. For this reason, always wear safety glasses and sturdy work gloves.
Why Outdoor Spigots Leak and Waste Water
Identifying where the water escapes helps you pick the right repair step:
-
Leaking from the Spout Tip When Closed: If water drips out of the threaded hose nozzle when the faucet is turned fully off, the bottom rubber bibb washer is worn or cracked.
-
Leaking Around the Handle Stem When Open: If water sprays or seeps around the handle wheel while watering your garden, the packing nut is loose or the internal packing washer has failed.
-
Leaking from the Vacuum Breaker Cap: If water squirts from the plastic anti-siphon cap on top of the spigot, the internal vacuum breaker diaphragm needs a quick rubber seal swap.
Step-by-Step Guide: How to Fix a Leaking Outdoor Spigot
Step 1: Shut Off the Main Water Supply
First, turn off incoming water to prevent an outdoor geyser:
-
Locate your home’s main water shut-off valve, usually located in a ground box near the street or where the main line enters the house.
-
Turn the valve clockwise until it closes completely.
-
Return to the leaking outdoor spigot and turn the handle fully counterclockwise.
-
Let all trapped water drain out into a bucket until the flow stops completely.
Step 2: Remove the Spigot Handle and Packing Nut
Next, disassemble the upper handle components:
-
Remove the small screw located in the center of the faucet handle using your screwdriver.
-
Pull the wheel handle straight off the grooved metal stem. If mineral crust has locked the handle on, tap it gently with your wooden screwdriver handle to loosen it.
-
Locate the large brass packing nut situated just behind the handle stem.
-
Place your first wrench firmly on the main spigot body to hold it steady against the wall.
-
Place your second wrench on the packing nut and turn it counterclockwise to loosen and remove it.
Step 3: Extract the Brass Valve Stem Assembly
Now pull the moving valve core out of the faucet:
-
Thread the handle back onto the bare stem temporarily.
-
Turn the handle counterclockwise as if opening the faucet.
-
The internal threads will back the entire brass valve stem right out of the spigot body.
-
Pull the stem assembly out and place it on your clean work cloth.
-
Inspect the brass stem for hairline cracks or bent shafts. If the metal looks solid, you only need to replace the inexpensive rubber parts.
Step 4: Replace the Worn Rubber Bibb Washer and Screw
The bottom washer stops water flow when you turn the faucet off:
-
Look at the bottom end of the brass stem. You will see a black rubber washer held in place by a small brass screw.
-
Unscrew the brass screw. If the screw head is corroded, soak it with penetrating oil before turning.
-
Pry the old, hardened washer out of the recessed brass cup using your utility knife.
-
Select a matching new neoprene washer from your kit. A beveled washer often seals better against older valve seats than a flat washer.
-
Coat the new washer lightly with plumber’s silicone grease.
-
Place the new washer into the brass cup and fasten it tight with a new brass screw.
Step 5: Replace or Repack the Stem Packing Washer
This step stops water from leaking around the handle while the hose runs:
-
Look under the packing nut on the upper portion of the stem.
-
Remove the old rubber packing washer or dried graphite string.
-
Wrap fresh graphite or Teflon packing string three to four times tightly around the stem shaft, or slide a new rubber packing washer into place.
-
Apply a light dab of silicone grease over the packing material to ensure smooth handle rotation.
Step 6: Reassemble, Restore Water Pressure, and Test
Finally, put the faucet back together and verify your work:
-
Shine a flashlight inside the open spigot body on the wall. Check the smooth circular brass ring (the valve seat) deep inside. Scrub away loose mineral grit with an old toothbrush.
-
Slide the valve stem back into the spigot body and turn it clockwise by hand until it threads in smoothly.
-
Reinstall the packing nut. Hold the spigot body with one wrench while snugging the packing nut down with your second wrench. Tighten it firm, but avoid crushing the packing material.
-
Reattach the wheel handle and tighten the center screw.
-
Turn the spigot handle completely off.
-
Return to your main water shut-off valve and turn the household water supply back on slowly.
-
Inspect the outdoor spigot. Zero water should drip from the spout tip.
-
Next, turn the spigot handle fully on. Water should flow forcefully with zero leaks around the handle stem. Turn the faucet off, and your repair is complete.
Common Mistakes When You Fix a Leaking Outdoor Spigot
Avoid these common DIY errors to keep your outdoor plumbing working properly:
-
Using only one wrench on the packing nut: Cranking on a stuck packing nut without holding the faucet body can twist and rupture soft copper pipes inside your stucco wall. Always brace the faucet body with a second wrench.
-
Overtightening the handle to stop a drip: Cranking the handle with brute force crushes rubber washers against the brass seat, destroying new washers in days. If a faucet drips, replace the washer instead of forcing the handle.
-
Reusing corroded brass screws: An old, weakened screw can snap off flush inside the stem during installation. Always use a fresh brass screw from your washer repair kit.
-
Using petroleum jelly instead of silicone grease: Vaseline softens and dissolves natural and synthetic rubber washers within weeks. Always use food-grade plumber’s silicone grease.
Ventura County Hard Water and Outdoor Plumbing Tips
Regional climate and water chemistry require simple ongoing maintenance:
-
Ventura and Oxnard (Combating Coastal Salt Air and Mineral Crust): Ocean fog combined with hard tap water creates white calcium crust on outdoor hose bibbs. Wipe down your spigots twice a year with a rag soaked in warm vinegar to keep the valve stems free of mineral scale.
-
Camarillo and Thousand Oaks (Managing High Pressure and Heat): Inland summer heat bakes outdoor rubber washers, while municipal water pressure can spike above 80 PSI. Check your home’s pressure regulator valve, and replace outdoor spigot washers every two to three years to prevent high-pressure blowouts.
When to Call a Professional to Fix a Leaking Outdoor Spigot
While replacing washers is a simple DIY project, certain plumbing conditions need skilled trade help:
-
A pitted, cracked, or deeply grooved brass valve seat inside the wall body that cuts new rubber washers instantly.
-
A freeze-damaged or ruptured frost-free sillcock that leaks inside your wall cavity when turned on.
-
Leaks occurring behind the wall where the spigot threads into internal house plumbing pipes.
If your spigot pipe is damaged behind the stucco, your shut-off valve is stuck, or you want a pro to handle your home maintenance checklist, Paul Franc Handyman Services is ready to assist. Proudly serving homeowners, landlords, and commercial spaces throughout Ventura, Oxnard, Camarillo, Thousand Oaks, and surrounding Ventura County communities, we provide dependable, quality home repairs done right the first time. Visit paulfranc.com to request an estimate or schedule your service today.