That steady, rhythmic drip echoing from your kitchen or bathroom sink at night does more than test your patience. When you neglect a dripping tap, you waste significant amounts of treated water and drive up your utility expenses. According to the Environmental Protection Agency (EPA) WaterSense Program, a single faucet dripping at just one drip per second wastes over 3,000 gallons of water each year—equivalent to the water needed for more than 180 showers.
Across Ventura County, unaddressed plumbing leaks hit household budgets especially hard. Water agencies serving Ventura, Oxnard, Camarillo, and Thousand Oaks employ tiered conservation rate structures where excess consumption carries premium surcharges. Furthermore, regional groundwater supplies carry elevated mineral hardness. Dissolved calcium and magnesium build up around rubber O-rings and ceramic disc seals inside faucet stems, accelerating mechanical friction until internal seals fail completely.
Fortunately, learning how to fix a leaky faucet is an approachable weekend project. You rarely need to replace an entire expensive designer faucet fixture. In almost every modern single-handle fixture, replacing the small internal cartridge restores a tight, leak-free seal in under an hour. This comprehensive guide provides clear, practical instructions so you can fix a leaky faucet safely and effectively.
Project Overview: Fixing a Leaky Faucet
-
Skill Level: Beginner to Intermediate
-
Estimated Time: 45 to 60 minutes
-
Average DIY Cost: $15 – $35 (for an exact replacement cartridge and plumber’s grease)
-
Estimated DIY Savings: $150 – $275 compared to a standard plumbing service call
Tools and Materials Needed to Fix a Leaky Faucet
Gathering your plumbing hand tools ahead of time prevents scrambling while your household water is turned off.
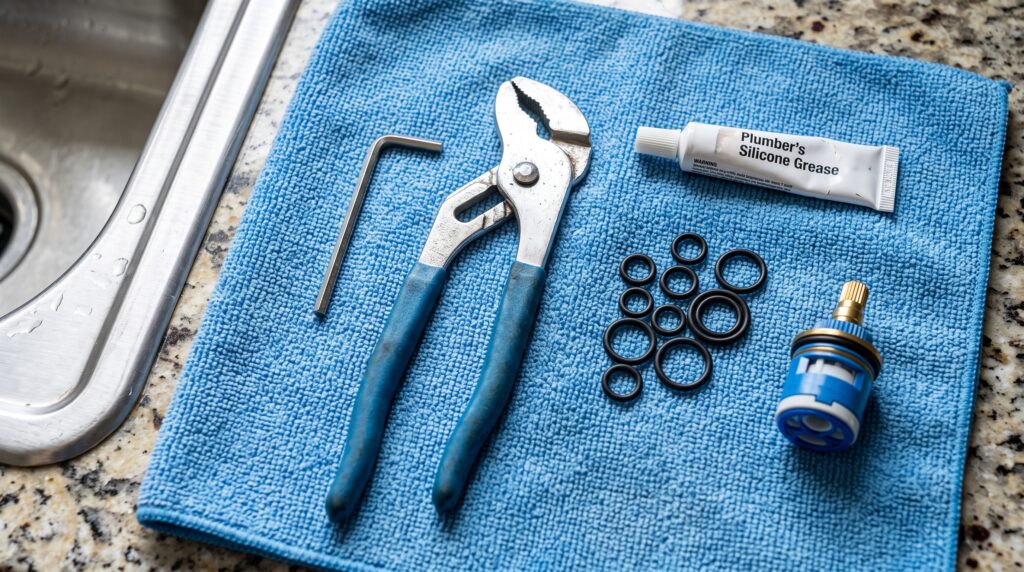
Essential Tools
-
Allen hex wrench set (especially 3/32-inch and 1/8-inch): Required to remove the hidden set screw securing modern faucet handles.
-
Adjustable wrench or channel-lock pliers: For loosening the decorative dome cap and brass cartridge retaining nut.
-
Flathead and #2 Phillips screwdrivers: For popping off decorative index caps and adjusting internal bracket screws.
-
Cartridge puller tool (optional but helpful): Specially engineered to extract frozen Moen or brass cartridges without damaging copper supply lines.
-
Old toothbrush and distilled white vinegar: Dissolves stubborn mineral crusting inside the faucet valve body.
-
Clean microfiber towel: Covers the sink drain opening to catch dropped screws and protect countertop stone.
Recommended Materials
-
Exact OEM replacement cartridge: (e.g., Moen 1222/1225, Delta RP50587, or Kohler ceramic disc cartridges).
-
Food-grade plumber’s silicone grease: Lubricates fresh rubber O-rings for smooth handle operation; never use petroleum jelly.
-
Replacement rubber O-rings and seats-and-springs kit: (If servicing older ball-type or compression faucets).
Safety Precautions Before You Fix a Leaky Faucet
Plumbing repairs require careful preparation to avoid accidental water damage:
-
Always plug the sink drain opening: Before loosening any hardware, cover the sink drain with a clean washcloth or rubber drain stopper. Tiny set screws and brass retainer clips drop down open drain pipes in an instant.
-
Shut off under-sink isolation valves firmly: Locate the oval shut-off valves inside the cabinet below the sink and turn them clockwise until tight. Open the faucet handle to relieve residual line pressure and verify zero flow before disassembling the spout.
-
Support the faucet body when torquing nuts: Never exert heavy wrench pressure on a retaining nut without holding the faucet body firmly with your other hand. Excessive twisting torque can loosen the under-sink mounting shank or twist thin copper supply lines.
-
Follow industry standards: Ensure all replacement parts comply with residential backflow and material standards established by the International Association of Plumbing and Mechanical Officials (IAPMO).
Understanding Why Kitchen and Bath Faucets Leak
Determining where water escapes helps you pinpoint the defective component before you begin:
-
Dripping steadily from the spout tip: When water continues trickling out of the aerator even when the handle is pressed fully off, the internal cartridge seal or ceramic disc has worn out. Replacing the central cartridge resolves this immediately.
-
Water pooling around the faucet base: If water puddles on your countertop around the bottom of the faucet body every time you run the tap, worn rubber O-rings around the cartridge body or swivel spout are failing.
-
Water spraying under the cabinet: If leaks appear beneath the sink, flexible braided supply lines or pull-out spray hoses have degraded and require replacement.
Step-by-Step Guide: How to Fix a Leaky Faucet
Step 1: Shut Off Under-Sink Water Valves
First, isolate the sink plumbing from pressurized water:
-
Clear out cleaning supplies beneath the sink to expose the hot and cold angle shut-off valves on the back wall.
-
Turn both valve knobs clockwise until they stop completely.
-
Move the faucet handle to the middle position and lift it fully upward. A small burst of residual water will drain out, followed by total silence.
-
If water continues trickling after two minutes, your under-sink shut-off valves have seized internally. You must shut off your home’s main water meter valve before proceeding.
Step 2: Remove the Faucet Handle and Decorative Cap
Modern faucets hide their mechanical fasteners beneath clean trim pieces:
-
Place your clean towel over the sink basin drain opening.
-
Look on the front, side, or underside of the faucet handle for a tiny decorative plastic plug (often marked with red and blue temperature dots).
-
Pry the plug loose using the tip of a utility knife or thin flathead screwdriver to reveal the recessed set screw.
-
Insert the matching Allen hex wrench into the set screw and turn counterclockwise two full turns. You do not need to remove the tiny screw entirely.
-
Lift the handle straight upward off the brass cartridge stem. If mineral crust has seized the handle, wiggle it gently side-to-side while pulling upward.
-
Unscrew the decorative dome collar by hand. Wrap a rubber jar opener around the dome if it feels stuck; avoid metal pliers that scratch decorative finishes.
Step 3: Remove the Retaining Nut and Damaged Cartridge
With the exterior trim removed, the functional valve mechanism is fully accessible:
-
Locate the large brass retaining nut holding the cartridge inside the valve housing.
-
Fit your adjustable wrench around the flat edges of the brass nut and turn counterclockwise to remove it.
-
If servicing a Moen faucet, use needle-nose pliers to pull the U-shaped brass retaining clip straight up and out of its slot. Store this clip safely on your towel.
-
Grasp the brass or plastic stem of the cartridge with pliers and pull straight upward.
-
If hard water scale has locked the cartridge in place, attach a specialized cartridge puller tool, twist gently to break the mineral seal, and slide the cartridge out smoothly.
Step 4: Clean Mineral Deposits from the Faucet Body
Never slide a brand-new cartridge into a dirty, mineral-crusted valve body:
-
Shine a flashlight down inside the open brass faucet chamber.
-
Inspect the interior walls for white crusty calcium scale and grit.
-
Dip an old toothbrush into distilled white vinegar and scrub the interior chamber walls thoroughly. Vinegar dissolves calcium carbonate deposits without scratching brass.
-
Wipe the cavity with a clean microfiber rag to remove all loosened debris. A clean, smooth brass housing ensures that new rubber seals seat properly without tearing.
Step 5: Install the New Replacement Cartridge and O-Rings
Installing the replacement cartridge correctly guarantees smooth temperature blending:
-
Compare your old cartridge side-by-side with your replacement unit to verify identical length, diameter, and indexing tabs.
-
Apply a light film of food-grade plumber’s silicone grease across the exterior rubber O-rings of the new cartridge.
-
Align the small raised plastic tabs on the sides of the cartridge with the corresponding notches cast into the brass faucet housing.
-
Press the cartridge firmly straight down into the housing until it seats flush. You should feel a positive mechanical stop.
-
Reinstall the U-shaped brass retaining clip (if applicable), sliding it completely down into its retaining grooves.
-
Thread the brass retaining nut back into place and tighten it with your adjustable wrench until snug. Avoid over-torquing, which deforms internal plastic parts.
Step 6: Reassemble, Restore Water, and Test for Leaks
Finally, reassemble your trim and verify flawless operation:
-
Thread the decorative dome collar back on by hand.
-
Slide the faucet handle back onto the cartridge stem and tighten the recessed set screw with your Allen wrench. Press the decorative index plug back into its hole.
-
Unscrew the aerator screen from the end of the faucet spout.
-
Turn on both under-sink shut-off valves counterclockwise to restore water pressure.
-
Open the faucet handle to the warm setting and let water run freely for 60 seconds without the aerator. This flushes out loosened mineral sediment and trapped air bubbles.
-
Reinstall the clean aerator screen, turn the handle fully off, and check all seams with a dry paper towel. If the paper towel stays dry and the spout stops dripping, your repair is complete.
Common Mistakes When You Fix a Leaky Faucet
Avoid these frequent DIY pitfalls to prevent frustrating re-work and damage to your fixtures:
-
Installing the cartridge 180 degrees backward: Most single-handle cartridges feature a hot and cold orientation tab. Installing the cartridge backward reverses temperature controls, making cold water run hot and hot water run cold. If this happens, pull the cartridge and rotate it 180 degrees.
-
Using petroleum-based grease on rubber seals: Products like Vaseline or automotive grease degrade natural and synthetic rubber O-rings, causing early seal failure. Always use food-grade silicone plumber’s grease.
-
Overtightening the brass retaining nut: Crushing the cartridge body with heavy wrench force binds internal ceramic discs, making the handle stiff and hard to turn. Tighten the nut until snug, but avoid excessive torque.
-
Forcing frozen cartridges with vice grips: Rocking a frozen cartridge violently with heavy pliers can shear the internal brass housing or snap soldered copper lines beneath the sink. Always use an inexpensive cartridge puller tool when dealing with stubborn mineral buildup.
Ventura County Hard Water and Faucet Care Tips
Regional water chemistry impacts plumbing fixtures across our communities:
-
Ventura and Oxnard (Combating Coastal Salt Air and Lime Scale): Mineral-rich tap water combined with coastal ocean air creates persistent crusting on faucet handles. Wipe down your faucet bases weekly with a microfiber cloth and dilute vinegar to prevent calcium from creeping beneath decorative dome collars.
-
Camarillo and Thousand Oaks (Managing High Mineral Content): Water supplies in the Conejo Valley carry substantial dissolved solids. Remove and soak your faucet aerator screens in a small cup of warm vinegar every six months to clear trapped mineral pellets and maintain strong water flow.
When to Call a Professional to Fix a Leaky Faucet
While replacing an internal cartridge is an achievable DIY project, certain plumbing conditions warrant professional craftsmanship:
-
Seized, corroded under-sink shut-off valves that leak or refuse to turn off, requiring fresh quarter-turn ball valve installation.
-
Hairline cracks or pinhole leaks in the cast brass faucet body or soldered copper supply tubes beneath the sink deck.
-
Deeply corroded commercial-style pull-down spray wands with damaged internal check valves.
If your faucet hardware has seized, your shut-off valves are dripping, or you have a growing home repair to-do list, Paul Franc Handyman Services is ready to assist. Proudly serving homeowners, landlords, and commercial spaces throughout Ventura, Oxnard, Camarillo, Thousand Oaks, and surrounding Ventura County communities, we deliver dependable, quality home repairs done right the first time. Visit paulfranc.com to request an estimate or schedule your service today