Peeling exterior paint and soft, spongy wood on an exterior window frame are clear warning signs of trouble. When water pools on a flat exterior ledge, fungal spores feast on damp wood fibers. If left unchecked, that rot spreads into the wall framing. When you learn how to repair a rotted window sill, you save the original window frame and stop water intrusion. According to historic window repair standards from the National Park Service (NPS) Preservation Guidelines, treating damaged wood with liquid consolidants and structural epoxy saves original woodwork while creating a permanent, waterproof seal.
Across Ventura County, exterior wood sills face harsh seasonal weather cycles. For example, beach towns like Ventura and Oxnard experience heavy ocean fog and wet winter storms. That constant dampness soaks into unsealed wood joints, causing rapid rot and soft spots. Meanwhile, inland communities like Camarillo and Thousand Oaks endure blazing summer sun followed by dry Santa Ana winds. This strong sun exposure bakes exterior paint coatings until they crack open, allowing winter rains to seep directly into bare wood.
Fortunately, learning how to repair a rotted window sill is an achievable, cost-effective weekend project. You do not need to spend thousands of dollars replacing the whole window unit. In fact, modern two-part epoxy wood fillers bond directly to sound wood fibers, curing into a rock-solid repair that will never rot again. In addition, these methods follow wood durability guidelines from the USDA Forest Products Laboratory. This complete guide shows you how to repair a rotted window sill cleanly and permanently.
Project Overview: Repairing a Rotted Window Sill
-
Skill Level: Intermediate
-
Estimated Time: 3 to 4 hours of active work (plus overnight curing)
-
Average DIY Cost: $35 – $65 for liquid hardener, epoxy filler, and primer
-
Estimated DIY Savings: $400 – $900 compared to a full window replacement
Tools and Materials Needed to Repair a Rotted Window Sill
Gathering your carpentry supplies beforehand ensures a clean, steady repair workflow.
Essential Tools
-
1/2-inch or 3/4-inch wood chisel: Scrapes soft, spongy decayed wood out of the sill.
-
Awl or flathead screwdriver: Probes the wood grain to find the exact boundaries of soft rot.
-
Wire brush and stiff nylon brush: Cleans out loose wood fibers and surface dirt.
-
Flexible 2-inch and 3-inch putty knives: Mixes and tools the two-part epoxy paste flat.
-
Medium and fine sandpaper (80-grit and 120-grit): Shapes and smooths the cured epoxy patch.
-
Disposable paintbrush: Applies the liquid epoxy wood hardener deep into sound wood pores.
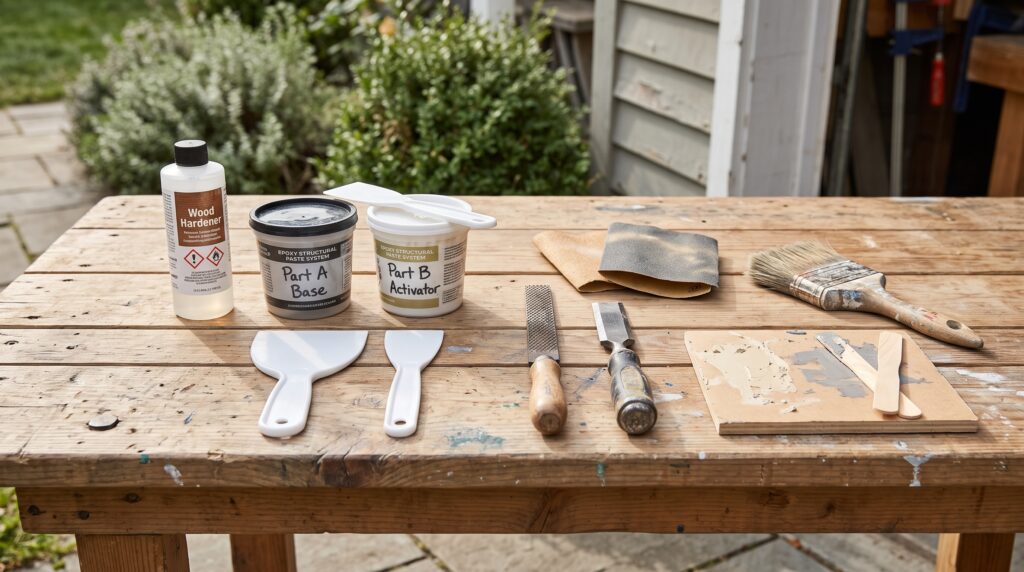
Recommended Materials
-
Liquid epoxy wood hardener (wood consolidant): Soaks into soft wood fibers and cures like rock.
-
Two-part structural epoxy wood filler: Never use cheap drywall spackle or soft Bondo; choose true two-part wood epoxy.
-
Exterior 100% acrylic bonding primer: Prepares the patched surface for paint.
-
Exterior acrylic house paint: Matches your current exterior window trim color.
-
Rubbing alcohol or acetone: Cleans epoxy residue from putty knives and tools.
Safety Precautions Before You Repair a Rotted Window Sill
Working with older exterior wood and chemical resins calls for basic safety habits:
-
Test for older lead paint: Homes built across Ventura County before 1978 often contain lead paint. Therefore, test old paint layers before scraping or sanding, and follow lead-safe work rules.
-
Wear safety glasses and work gloves: Chiseling brittle wood sends sharp chips flying into the air. In addition, uncured epoxy can irritate bare skin, so always wear nitrile gloves.
-
Work in a well-ventilated outdoor space: Epoxy hardeners release mild chemical fumes while curing. For this reason, work outdoors or open nearby windows wide.
Why Exterior Window Sills Rot and Decay
Understanding why wood rots helps you prevent future damage:
-
Standing Water on Flat Surfaces: Window sills must slope slightly downward to shed water. If paint cracks, rainwater sits on the horizontal wood and soaks deep inside.
-
Fungal Spore Growth: Wood rot is actually caused by living fungi. These microscopic organisms need oxygen, warmth, and moisture above 20% to eat away wood cellulose.
-
Failed Caulking Seams: When caulk shrinks along the side brick-mould trim, water runs behind the window casing where it cannot dry out.
Step-by-Step Guide: How to Repair a Rotted Window Sill
Step 1: Probe and Scrape Out the Soft Rotted Wood
First, remove all decayed, crumbly wood fibers:
-
Use an awl or screwdriver to poke the painted sill. Sound wood feels firm, while rotted wood gives way easily like a damp sponge.
-
Use your wood chisel and scraper to carve away all soft, dark, stringy wood fibers.
-
Continue digging out the rotted wood until you reach bright, solid wood on all sides.
-
Next, use a stiff wire brush to clean away loose wood splinters and dust from the open cavity.
Step 2: Let the Cleaned Wood Cavity Dry Out
Epoxy will not cure properly over wet wood:
-
The remaining sound wood inside the hole must be completely dry before applying chemicals.
-
If the wood feels damp from recent rain or ocean fog, let it dry in the sun for 24 hours.
-
Alternatively, you can speed up drying by waving a handheld hair dryer over the exposed wood for 15 minutes.
-
Then, blow out all remaining wood dust with a shop vacuum.
Step 3: Apply Liquid Epoxy Wood Hardener
Now strengthen the remaining sound wood fibers:
-
Pour a small amount of liquid epoxy wood hardener into a disposable cup.
-
Use an inexpensive paintbrush to coat the exposed wood cavity liberally.
-
The thin liquid hardener wicks deep into the wood grain, killing active fungus spores and binding loose wood fibers together.
-
Apply a second coat after 10 minutes, making sure the wood is fully soaked.
-
Let the hardener cure for two to four hours until the wood feels rock-solid and tacky.
Step 4: Pack the Gap with Two-Part Epoxy Wood Filler
Next, rebuild the missing shape of the window sill:
-
Scoop equal parts of Part A resin and Part B hardener onto a small scrap board.
-
Blend the two putty pastes thoroughly with your putty knife until the mixture turns a uniform color with zero streaks.
-
Press the mixed epoxy firmly into the bottom and sides of the wood cavity. Work the paste deep into the corners to eliminate hollow air pockets.
-
Build up the patch so it rises slightly higher than the surrounding wood sill.
-
Use your putty knife to shape the top slope so it matches the original sill angle.
-
Clean your putty knives right away with a rag and rubbing alcohol before the epoxy hardens.
Step 5: Sand and Shape the Cured Window Sill Profile
Once cured, the epoxy shapes just like real wood:
-
Allow the epoxy filler to cure completely for 6 to 8 hours (or overnight).
-
The cured epoxy will feel hard and solid under your fingernail.
-
Wrap 80-grit sandpaper around a flat sanding block. Sand the patch flat, blending it flush with the surrounding wood sill.
-
Next, switch to 120-grit sandpaper for a final smooth pass.
-
Re-create the front rounded drip edge with light sanding strokes so water runs off cleanly.
Step 6: Prime and Paint with Exterior Acrylic Paint
Finally, protect your newly restored sill from the weather:
-
Wipe away all fine sanding dust with a dry microfiber cloth.
-
Apply a coat of premium 100% acrylic exterior masonry and wood primer over the entire sill. Primer ensures that the finish paint bonds tightly to both the epoxy and the bare wood.
-
Allow the primer to dry for two hours.
-
Then, apply two coats of high-grade exterior acrylic latex paint.
-
Finally, run a fresh bead of paintable exterior polyurethane caulk along the side joint where the sill meets the vertical window trim.
Common Mistakes When You Repair a Rotted Window Sill
Avoid these frequent DIY pitfalls to ensure your repair lasts for decades:
-
Leaving damp, soft rot behind: If you fail to chisel away all the crumbly wood, active fungus will continue rotting the frame from the inside out. Always carve down to bright, solid wood.
-
Using cheap automotive body filler (Bondo): Standard polyester body fillers are too stiff for outdoor wood. Wood expands and contracts with the seasons, causing brittle polyester fillers to crack and pop loose. Always use flexible, two-part exterior wood epoxy.
-
Skipping the liquid hardener step: Packing filler over raw, dry-rotted fibers creates a weak bond. The liquid hardener acts like an adhesive primer that locks the filler to the wood.
-
Failing to slope the sill downward: A flat or cupped sill lets water pool against the glass. Always shape the patch so it slopes gently downward away from the house.
Ventura County Climate Tips for Exterior Wood Care
Our local weather patterns call for steady seasonal exterior care:
-
Ventura and Oxnard (Marine Fog and Winter Storms): Heavy coastal moisture and driving winter rains test exterior paint seals. Inspect all south-facing and west-facing window sills every autumn, and touch up chipped paint before winter storms bring driving rain.
-
Camarillo and Thousand Oaks (Inland Sun and Thermal Stress): Strong Conejo Valley sunshine bakes horizontal wood sills, drying out paint until hairline cracks appear. Reapply exterior caulk around window casings every two to three years to stop rain from entering behind the trim.
When to Call a Professional to Repair a Rotted Window Sill
While surface sill repairs are an achievable DIY project, certain window conditions need skilled trade help:
-
Rot that has eaten completely through the sill and softened the structural 2×4 framing studs beneath the window.
-
Severe rot spreading into the internal window sash tracks, counterweight pockets, or structural jambs.
-
Historic leaded glass or casement window frames that require custom wood millwork and historical joinery.
If your window frames need structural carpentry, your exterior trim needs weatherproofing, or you prefer a professional to handle your home maintenance checklist, Paul Franc Handyman Services is ready to assist. Proudly serving homeowners, landlords, and commercial spaces throughout Ventura, Oxnard, Camarillo, Thousand Oaks, and surrounding Ventura County communities, we provide dependable, quality home repairs done right the first time. Visit paulfranc.com to request an estimate or schedule your service today.